We don’t use our garage for our cars. Its household storage and where we keep the litter boxes for the cats. We have a cat door that goes from the inside the house to the garage and it allows us to keep that smell out of the public view.
As a result, the garage is in a constant state of smelling like pee.
Well, pee and and cat throw up.
If you have cats you totally know what I mean.
Finally, after about the umpteenth time of feeling knocked out by the whiff every time I went out there and grossed out by the flooring, I started to do some research on how to get urine up from the concrete. As a result I discovered that you can refinish your garage flooring with every little cost, which seemed like a great idea for us for maintenance purposes.
Now this was back over the winter and we have been waiting for the weather to warm up. When you redo your garage you have to have a temperature above 55 degrees. Living on the coastline, it was also important that we hit the spring weather and not the summer sun. Nothing like baking yourself while doing work outside.
The garage isn’t exactly a container of breeze.
So here we go….
How to Refinish your Garage Floor
(Do It Yourself Home Tutorial)
Keep in mind that we are not professionals. We are not handymen or handy women, we are just regular old mom and dad that did a home project and here are our results and how we did it:
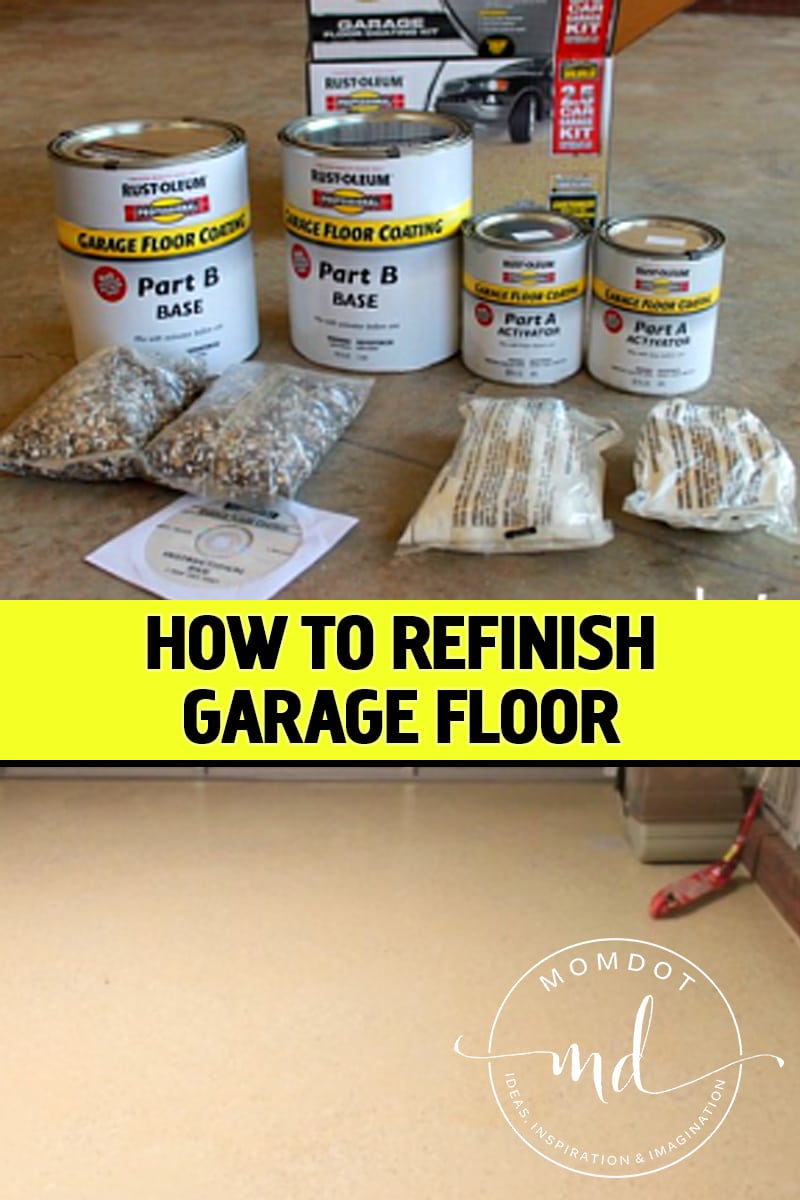
Step #1) The first thing you need to do is head out to Lowes and pick up a kit. When you get there, its relatively overwhelming as you can purchase all the items separately or packaged together by companies like Rust-Oleam. We chose to do a kit so we know we didn’t leave anything out. The kits generally come in 1 or 2.5 car garage sizes. We chose a 2.5 car garage size to be on the safe side but we have an entire set of cans we didn’t use, so if you know your square footage you don’t have to waste money. You can purchase a kit here on Amazon for a great price.
The kit was approximately $108 and included etcher, the paint and epoxy, the sprinkle chips, instructions and a 5 minute DVD (that we did watch). You can buy a tan color, a gray color, or have your tan dyed about 10 different colors at the paint counter. They have samples from green to mauve if you so choose.

- A) Because of our garage situation where it was a complete mess, we also purchased a degreaser (Quickcrete) separately. The cost was about $24, but well worth it. Cleaning your garage flooring is the KEY TO SUCCESS in this project. If you use your garage for parking and have oil or grease, you will need to do the same thing. In fact, I recommend it period.
- B) Other supplies that you will need to pick up if you don’t have at home: A few floor stiff bristle floor scrubbers, paint rollers, paint brush for the trim, tape for your trim, and extension poles for your paint rollers.
Step #2) Once you are home, you have to begin the process of getting everything out and clearing the floor of loose dirt. Once we had the garage stuff laid out on the lawn (we had people stop thinking we were having a garage sale), you can just use a leaf blower to get the excess dirt out.
We put Charlotte to work. She is a great helper.

Step #3) Once the garage has the floor clear, you start with your degreaser. Read the back for the instructions but you work in sections around the garage. You mix with part water and then our in a section, scrub, rinse and so on.
The preparation of the garage itself took the longest out of the whole day.

Once you are done with the degreaser, you will move on to the etcher that came in your kit. Its the same process. The difference in etching is it has a citric acid in it (does not smell pleasant in my opinion), but it seemed to get up the rest of what was on our floor. The garage must remain wet the entire time you are doing the etching.
When you are done with both steps your garage has to dry COMPLETELY before you can move on. We put blowers on our garage to assist in drying, but it did take a few hours to get the concrete ready to go.
Tip: Buy a Long Squeegee to get out excess pools of water to speed up this process.
Step #4) After the garage is dry, mix your part A and part B and stir for a full 3 minutes. Once that is prepared, you start by doing the edges with a paintbrush. This is where you can learn from our mistakes. We did NOT put painters tape up to protect the brick sidewall trim. We will have to go back and either paint the brick or use a power washer to remove that paint. PUT UP TAPE to save your trim from bleeding over!
Once you are done putting up the tape, go around with a paintbrush and do the sidewalls with a paintbrush. Chris started at one end and I started at the other.

Step #5) When the edges are done, you can move on to the floor. You do the floor with your paint rollers and extensions and do it in 4×4 sections. If you try to do more than that you will find you can’t spread your paint chips properly.

The idea is to paint, sprinkle, paint, sprinkle. We started in the back and worked our way to the front of the garage. Originally we had both been doing a side, but found it more effective to have Chris paint and I would come behind and sprinkle after he had a section done.

This part went pretty quickly.
We also let Charlotte sprinkle the chips on the wet paint.
If you sprinkle too many or make a mistake, its OK to paint over the chips in a section.
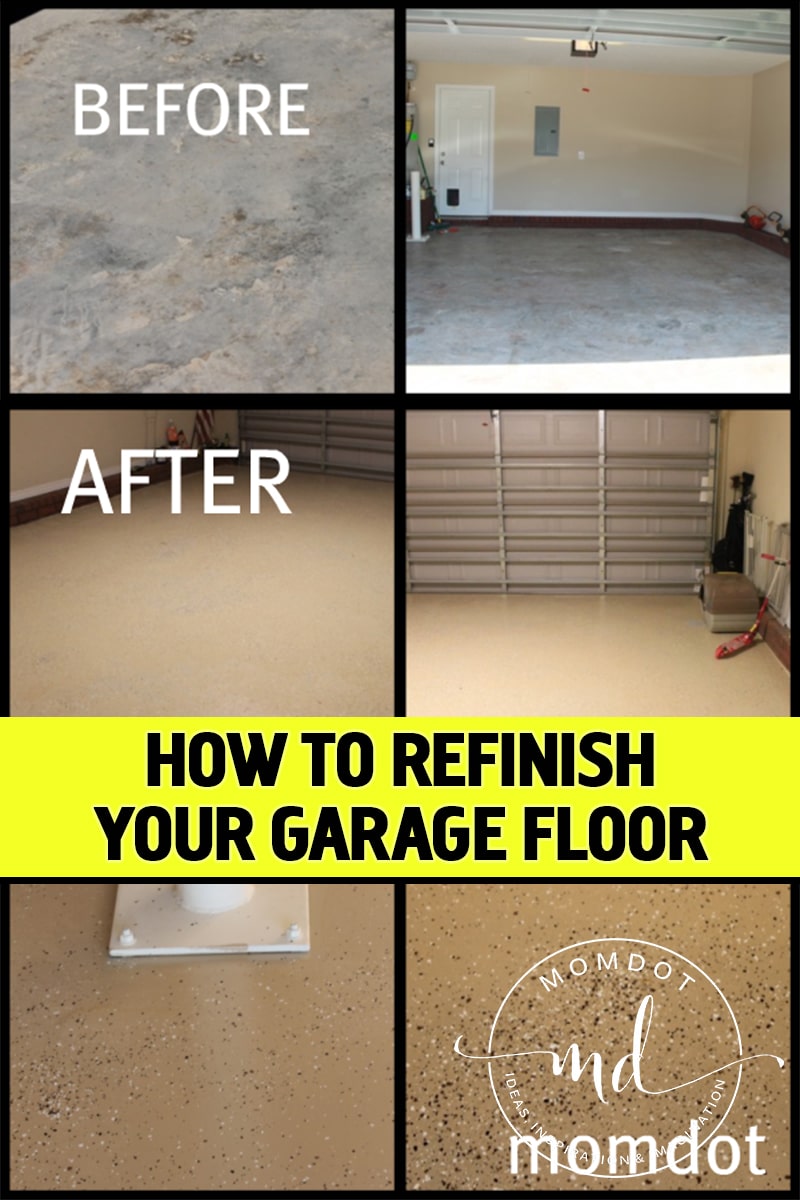
Final Results for Refinishing Garage Floor!
(except the trim which we have to go back and pressure wash)
- Cost: Approx $150 including paint rollers, kit, etc.
- Time: Block off 1 weekend day
- Can Kids Help? On the back it says keep children away…after all, it is a chemical. We let Charlotte help supervised. She is 6 and very responsible.
- This project can be done with 1 person, but goes much faster with two adults than 1.
- Pee smell in garage…completely gone


Coming up, we have some other home projects we will be sharing. I hope this was useful to someone. You can pick up your Rust-Oleum Garage Floor refinish kit here on Amazon for a great price.
~trisha
how smelly is the etching stuff? I am thinking about doing this application in my basement (that’s where I have throw up stains from my cats) plus I worry about the flammability in a closed basement. Your thoughts?
My husband said its a paint basically so its about as flammable as paint would be. It wasnt smelly when we did it BUT we were in an open air situation.
That’s a great idea. I had seen this at a friend’s house, but never knew how it was done.
That’s another project on my list to do besides painting my room. Thanks for the tutorial!
That is awesome! I want to do this to my patio!
OOooo….it’s nice! I would like to do that with our garage floor – IF I ever see it again from all the storage out there! haha!
Great tutorial and the after pics are amazing!!
Wow! That is a lot easier than I thought.Thanks for the tutorial Trisha!
Kas
This is the treatment we have been planning to do to our basement floor. Of course we’ve been planning it for a couple years, and it still hasn’t happened.
This is what my husband wants to do to ours. He needs to clean first lol. He has a HUGE mess out there. The garage floor looks great.
Looks FANTASTIC! I’ve always loved the look of epoxy floors with the sprinkles. I love that you did the step-by-step so people (like me!) who are interested can see exactly what they’re in for.
Totally awesome tutorial!! Thanks. I stumbled this!
Trisha, that looks incredible! We are going to try this in a few weeks …the worst part for us will be clearing out our garage which looks like it should be on an episode of Hoarders. We don’t park our cars in there either because while it’s suppose to be a 2 car garge, it’s more like 1 and 3/4. It has become the storage space for all the things we’re too cheap to pay the garbage service to pick up. sigh.