web analytics

How to make a Fairy Wand

How to Make a Fairy Wand (DIY) Tutorial

I have always wanted to Make a Fairy Wand (and you can now check out my how to make a tulle wand tutorial), but not the usual kind of puff ball fairy wand, something different, more creative. Today I decided to get my craft on and started to conjure up what kind of fairy tutu type wand I could make to match one of Charlotte’s new play ballerina dress up dresses.

My initial thought was to make more of a “crystal ball” fairy wand. I had visions of sparkles in water and some really unrealistic things for the time I had scheduled, so I spent some time walking around Micheal’s to find some inspiration. That place sure is fun in the holidays.

This is what I came up…the project took about 30 minutes.

STUFF YOU NEED

What you will need to create this Fairy Wand (or one of your own style) is the following:

  • Dowels (i opted for a larger dowel and cut it in half w/ a hand saw…that didn’t go so well) $.99
  • Ribbon to wrap the dowel $2.99
  • Tulle (I had this at home)
  • Clear plastic Christmas ornament $1.29 (get 2 in case you hot glue mess it up like I did)
  • stuff to put inside the ornament..I used a stream of marabou fluff, other ideas are flowers, glitter, ribbons, bows or rhinestones. My marabou cost $1.99
  • hot glue  (took just 1 stick)
  • I also bought some charms to add on from the bead aisle $5.99

INSTRUCTIONS

After you have your dowel cut to the right length, the first thing you do is wrap your ribbons around your wand. What I did was opt for one large ribbon to do the initial wrap and then a smaller ribbon to go around and cover the remainder of the dowel you could see. Its fairly easy to keep wrapping this around and then starting the 2nd one above and it should fall into perfect place.

I usually dab hot glue on the bottom, middle, and top, so if I move my fingers and it slips, I don’t unravel the entire thing.

Leave some excess ribbon once you reach the top to hang down or, if you prefer, make up some korker curly ribbon and use those to hang down. At this point on my wand, I left both strands of ribbon hang and then cut additional pieces and hot glued on the top so I had several pieces flowing.

Don’t be afraid to get girly here. I am not sure you can overkill on the fru-fru when you are talking about a fairy wand.

Next I set up the “crystal ball”.

Take your Christmas ornament and pull out the piece that hangs from the tree. Its easier to hot glue when its flat. Take the top off and stuff inside with your filler. You can also leave it empty and add flowers or rhinestones on the outside. The trick here is that once you hot glue something on it, it doesn’t peal off very nicely. I discovered that when I put on my fancy Bird of Paradise, decided I didn’t like it, and tried to take off.

What was left was a huge gaping mess, so I had to put it back.

Oh well, it was my first try, right?

Hot glue the top onto the ball so its secure.

After I had the wand and ball done, I gathered some tulle with a ribbon and again let the ribbon have some excess tails. I made two of them, hot glued them together in a cross, and trimmed up the tulle. I also took a piece of the ribbon and wound it through the heart charm, and attached that to the tulle and made a knot.

Then I added the tulle “cross” directly to the top of the wand.

I took some of the larger ribbon and covered the ornament part of the plastic ball and then turned upside down and hot glued the ball onto the tulle.

I’m not going to lie here…while it was really stuck and not going anywhere, the ball attached to the tulle made it slightly wobbly. More so than I liked. In the future, it might be smarter to attach the ball directly to the top of the wand and then add tulle with a small piece of elastic or some other clever way I haven’t discovered yet.

At this point you are pretty much done!

Its all decor from this point out.  I added a bird of paradise ornament I found in the Christmas aisle at Micheal’s, but I am regretting it. Unfortunately hot glue made it where I couldn’t take it off, so make sure you are sure before you stick.

(left: assembly pre-dressed up  , right: all gussied with flowers and birds)

Although a bit gaudy, Charlotte was a fan of the sparkly, so it wasn’t a total loss.

Consider adding satin bows to the front like I did or maybe even bells to the bottom of your ribbons so it makes a “charm” sound when you walk.  I have another wand I am trying out later on tonight or tomorrow, so I will post the results of how that one worked out.

If you liked this article, feel free to share the link, stumble, or twitter.

Maybe someone you know has a fairy in their life that needs some magic.

~Trisha

Other sites that may inspire you make a wand

How to Make a Fairy Flower Wand

The other day I made a sweet little fairy wand, a tulle wand, and showed you how to make a tulle pom pom. I had some left over materials, so I decided to make a flower fairy one.

Again, this type of wand (at least the way I made it) is meant for older kids that don’t have the curiosity to pull things apart. Because I chose to make mine with pins that go through the center of the flowers, please take care not to create something that you know for sure your child will pull apart and become a household hazard. Pins are no fun to step on.

Disclosure over.

How to Make A Fairy Flower Wand

Items needed:

  • box of lace pins
  • Styrofoam ball
  • dowel ribbons for the dowel
  • favorite flowers
  • glue/glue gun

1) Start by just taking the back off of each flower and pushing the pin through the middle and into the styrofoam. It took about 2 bundles of flowers for me to complete the entire ball. I made sure I pushed the flowers together because I liked the look of having all the flower petals mushed up, but you can choose to lay them flat.

Another thought is adding a rhinestone to the center of the flower once its pushed into place. That way the pin top is completely covered and it would add some bling to it.

2) Let your kitten help. Its more fun.

3) I then covered my dowel with my chosen ribbons, in this case it was purple and brown. I originally did it all in brown, removed it, did it in stripes and then thought I would add some leaves to the stem. Ultimately I didnt like the look so I tore it all off.

I think its ok to experiment because you can always start over!

4) Lastly I added a loop on the bottom so it was easy for my daughter to carry around with her.

I hope this inspires you to create some fun and fabulous fairy wands in your own home.

Happy Crafting!

~Trisha

Like this post? Consider tweeting or stumbling in order to help others let loose on their inner crafty mom!

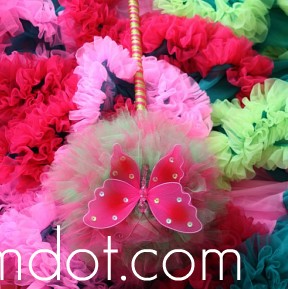
How to make a Tulle Pom Pom Ball

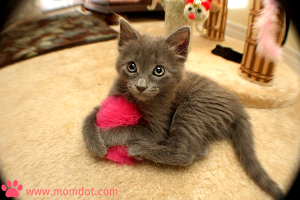
How to make a tulle pom pom ball for wands…otherwise known as, “how to make a cat toy” in my house.

I made a tulle wand the other day and I was going to give it to my friend Kims daughter, but she is pretty young and if she were to pull the pins out, it could mean a dangerous situation. Not wanting to responsible for my best friends child’s untimely death by lace pin, I decided to get to work on a tulle ball tutorial for all those in the same situation.

Except instead of a tulle wand, I’m going to turn my example into a cat toy for Gwen.

It could also be used for hair puff pony-o’s, cheer-leading pom poms, decorative shirt..um…decorations. Earrings? OK, that’s too far and way too 80′s.

Here is your How To Make a Tulle Ball {So you can still give it to the baby girl/kitten in your life} tutorial:

1) First you have to decide the size of your tulle ball. I took out a glass from my kitchen since I was making this for my kitten, and traced the edges on an old used shipping box I had laying around.

2) After tracing, I used a straight razor and cut the circles, including a smaller circle in the middle so it has an appearance of a doughnut. To be honest, I didn’t take care to make this perfect, so don’t kill yourself over it.

3) Take a string, twine, or whatever you want to use to tie the middle with. I had ribbon laying around, so I used a nice skinny ribbon. They have some really strong materials on the market if you are using your pom pom ball for something that needs to hold up long term.

4) Make a loop as if you are tying it and lay it between your 2 doughnut pieces. Its considered the cream now. Sandwich it up.

Ribbon cream.

(this is a real professional tut isn’t it)

5) Moving on to your tulle. My pom pom was going to be small since it was for a kitten toy, so I took about a yard of tulle and started wrapping. Just put your piece through the middle hole and then wrap around through the hole and back out again, round and round till its filled up.

6) Take a pair of crafting scissors and cut the outside of the tulle now around the entire thing. Take care not to cut your middle string if its sticking out somewhere.

Trust me, I cut mine.

7) Once the tulle is cut, you will have two distinct sides. You separate a little bit and you should see your string/ribbon/twine in the middle. This is where you tie that sucker up TIGHT in a knot.

8 ) Then pull off your cardboard sides and you will be left with a puffy ball.

9) Just trim your tulle ball up so the tulle is even and mush it around so your string is covered

10) Now you can attach it to whatever you want. Rules on attachment are going to depend on the craft you are making. In my house….well, it was just a cat toy.

So take it and throw!

Happy Kitten:

Btw, if you do want to make a cat toy, getting some crinkle paper or ribbon and wrapping around would also make it a ton of fun for a cat!

I’m going to test it out some other ideas and I’ll post an update when I have it.

~Trisha

How to make a Tulle Wand

After doing the post on how to make a fairy wand, I had extra materials that I had bought in preparation and decided to make a tulle wand. Here is a how to make a tulle wand tutorial and a few do it yourself directions that will hopefully inspire you to create for Christmas or even Halloween if you are still looking for an outfit completer for your princess (or fairy!).

To Make this Tulle Wand you will need:

  • Styrofoam Ball (they come in lots of shapes, I have just used a ball) (2 for $4 at Hobby Lobby)
  • Straight pins (I used bridal and lace ones) ($1.89 at Micheal’s)
  • Dowel (I used the other half of the one from my fairy wand) ($.99)
  • Ribbons for the dowel (I got these 50% off at Hobby Lobby yesterday, $1 a roll)
  • Butterfly or other decor ($1.99 at Hobby Lobby)
  • Tulle (I had this at home)

The first thing I did was cut my tulle into squares. I actually have tulle from the bolts, so its pretty long. I cut off about a 2 foot piece and cut length wise and stacked them on each other. Then I gathered and cut about every other 1.5 inches so it cut the tulle in long strips. Then I stacked the strips and cut again in 1.5 inches so basically what was left at the end was little squares. I didn’t pay too much attention to keep them even and if they are all jagged, its not a problem at all.

Its more about getting them closer to the same size over the exact shape.

I wanted to do my tulle ball in 2 colors, so I cut several preparation piles of tulle squares in two colors. Once you have your squares you can gather several squares at once (I thought 3 squares worked well) and I twisted the bottoms together which form more of a solid piece of tulle to stick your pin in.

Once gathered, stick pin and push into your tulle ball.

Continue until the entire ball is covered. It took me a few hours watching TV actually to fill it up how I wanted it.

Originally I had pushed in my dowel to create the spot for the wand, but that was pointless. At the end I couldnt even find the spot and had to make a new hole, so dont bother making a hole ahead of time.

(gwen helped me)

Once your tulle ball is done, its time to work on the wand.

I covered mine in hot pink ribbon, dabbing hot glue along the way every few inches to make sure it didnt runravel on me. Then I did a second color to cover the rest of the dowel.

After the dowel was covered, I added some Korker ribbon strings I had prepared before I started.

If you don’t know how to make korker ribbon (which is curly ribbon), all you do is heat your over to 275 and wrap your ribbon around your dowel, secure, lightly spritz with water over the dowel/ribbon, and bake for 10 minutes in the oven. Once you take it out, its curly. A lot of people put hairspray or other chemicals to make the ribbon stiff, but I generally don’t bother.

I added my ribbon to the top of the dowel and then removed some of the tulle to push a hole into the Styrofoam. Once I had the dowel inside the tulle ball, I pulled it out and put some hot glue on the dowel and put back in to secure.

Now from this point on its pure decoration.

I decided to take another strip of smaller hot pink ribbon and wrap around the dowel because it felt unfinished. I then added a small bow decorative bow in matching ribbon on the bottom. I also put a flower on the very bottom of the wand to give it more of a finished look.

Almost done, I pushed in a butterfly, which Charlotte really liked.

Because this wand has stick pins in it (although you cannot see them and they are unlikely to come out) its not really for a child that would be pulling the tulle out.

I would say more like 5 and up, but please judge your child and how likely they are to pull it all apart before you make this kind of wand. You can also check out my How to Make a Fairy Wand post for a hot glued version.

I think it turned out quite pretty! It is also super lightweight because its made with Styrofoam.

What do you think?

~Trisha