web analytics

21 Natural and Artificial Patterns

21 Natural and Artificial Patterns


Artists include Alex Maclean (from Wikipedia)

Alex S. MacLean (born 1947) is an American photographic artist who’s best known for his spectacular aerial photographs.

MacLean graduated as a BA in 1969 from Harvard. He continued his studies to become an architect in 1973. He became interested in aerial scenery while he studied community planning and got a flight permit in 1975. Since then he has flown around America and the world in his Cessna 182 taking pictures and he has become a renowned aerial photographer. His pictures that portray both natural and man-made landscapes have been on display in numerous exhibitions and books.

Robert Haas (From national geographic)

Robert B. Haas is the author and photographer of a series of six photographic books, including A Vision of Africa (1998), Predators (2001), African Critters (2002), Ten Days on the Chobe (2002), Through the Eyes of the Gods—An Aerial Vision of Africa (2005), and Through the Eyes of the Condor—An Aerial Vision of Latin America (2007). Both Through the Eyes of the Gods and Through the Eyes of the Condor were published by National Geographic.


Others include Michael Poliza, Claudia Rogge Nancy Lan, Alexey Bednij, Friedensenreich Hundertwasser and unknown.


My Nursery Mural

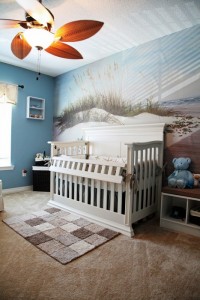
When I decided on a beach nursery, much of it was in my head. I live in the south and the view and emotions I get from going to Pensacola Beach are perceived in one way and I wanted so badly to make sure my sons room reflected that calm peace that you get when you walk out on white sands and emerald waters of my local area.

Part of doing that was finding the right wall coverings and I considered paint, wallpaper, hand painted murals, and regular murals. Now Charlotte has had both a hand painted mural and a wallpaper mural and both had their plus’ and minus’. Her wallpaper mural was difficult to add for us two short girls who did it and honestly, Charlotte and her friends have found ways to pick at the seams making it come up which leaves me having to find new paste in order to reattach (which I have yet to do). While the hand painted one was beautiful and very fun to do, it was never cleanly finished or had as dramatic an effect as I would have liked for this nursery – however I was able to place it and pick the colors around the room which was a great thing when I did her playroom

Still hand painted wasn’t the right choice.

When it came to Phoenyx I decided that a wall mural would have the most dramatic, clean, and soothing effect for his room and started researching Murals Your Way, the same place I got Charlotte’s. I emailed them my paint colors on the wall and they let me know the murals in my taste selection (beach) that would match the paint….yep!

I was so happy.

Sometimes staring at a computer screen is really hard. I even had picked a different mural and in the end they told me the stretch on the canvas wouldn’t look right, so they didn’t let me waste my time and be disappointed in the end. Because murals can cost from $100 to $1000′s of dollars, this was important.

This was the mural I went with in the end:

Also, last time we dealt with past and panels…no fun. Luckily for me, they are now offering a new type of mural, which includes NO paste.

WOOOOOOOOOOOHOOOOOOOOOOOOOOOOO!

They call it SmartStick:

SmartStick™ Repositionable Wall Covering

Just peel, stick and enjoy!

  • Lightly textured finish-comparable quality to our vinyl & canvas.
  • Reusable – wrinkle resistant & can be reinstalled many times.
  • Adheres to nearly any surface – just peel & stick.
  • Great for quick change decor.
  • Simple installation – no paste or tools needed.
  • Easy to clean, easy to remove, and tear proof.

Now the question is, would Smart Stick actually WORK?

The short answer is yes. Its fantastic compared to any painting or wallpapering and is 10 steps above any other offering. I would NEVER wallpaper again having used it. I found that there were re-sticking points where I had to peel and redo and it was not an issue. Because the room was premeasured, there was also no cutting, tools, nothing I had to have on hand to make the room transform.

Aside from that, depending on how large of a wall you are covering, don’t let me tell you its going to be flawlessly easy. You still have to line up your panels, stand on chairs and its absolutely a two person job if you are going a full wall. The first panel was the hardest, but once we figured out how to lay it straight and line it up, it went quickly.

The entire process took just under an hour and despite a 10 minute learning curve, was extremely easy. I would not only recommend it, but I would do it again.

Everyone that has seen the room has remarked how beautiful the walls look, how well it matches, and I 100% agree.

Of course, if you love it, please vote for me in the Parents Magazine Challenge and help me win $3000 for savings to start Phoenyx off right (and you can win too!) and also to go Murals  Your Way to transform your own walls! More “things I had in my room” nursery posts coming up this weekend so you can find exactly what you need for your nursery if you like mine.


~Trisha

—————

company provided mural to facilitate this review

MomDot in Parents Magazine!

This month (July) in Parents Magazine, you can see Charlotte and I (and two other bloggers) on page 16. We are competing in the Blueprint Baby Nursery Challenge.

My first post for the nursery challenge is here, but please come back over the next few weeks to watch it all unfold! My nursery is all done and I am itching to share the final shots…ack! I really love it to be honest.

I am trying to be patient and share on schedule, but its soooo hard.

This is my first national magazine publish with my blog name, so that was also a very cool thing to share with Baby Phoenyx when he gets older. Of course…its not Charlotte’s.


Hand Trux Toys Contest!

1st Annual “You Can Really Dig It” Sand Sculpting Contest

HANDTRUX TOYS

Beach + Summer Vacation + Kids = Sand Castle Contest! HandTrux Toys just announced the 1st Annual “You Can Really Dig It” Sand Sculpting Contest starting now through September 2011. We encourage families to build their wildest, most imaginative sand sculptures and submit their photographs. Winners will be chosen across all age categories and announced on September 30, 2011.

Details:
• Take pictures of your prized sand sculptures
• Submit your photographs to www.HandTruxToys.com/contest.asp.
• Open to all US and Canadian residents.
• Photos will be judged by creativity and originality.
• Vote for the winner at: www.HandTruxToys.com/contest.asp.
• Prizes awarded include: cash, gift certificates, autographed HandTrux Backhoes and other really cool prizes.

Follow along on the Facebook, Twitter, and the HandTrux Toys website to see who you’re up against as a new “King/Queen of the Sand Castle” will be posted weekly. “Come On & Get Dirty – You Can Really Dig It!”

Amazing Sidewalk Art

Have you ever seen Amazing Sidewalk Art? Its so lifelike and looks like its in 3d!

I have been in New Orleans and seen some pretty awesome works of art, all done from chalk. Julian Beever puts my 6 year old to shame…hahahahha.

But really, the talent out there is spectacular. Here are some amazing sidewalk art pictures so lifelike they will blow your mind! Have you ever seen one of these in person?


Like these? Check out Amazing Painted Bodies!

How to Make a Fairy Flower Wand

The other day I made a sweet little fairy wand, a tulle wand, and showed you how to make a tulle pom pom. I had some left over materials, so I decided to make a flower fairy one.

Again, this type of wand (at least the way I made it) is meant for older kids that don’t have the curiosity to pull things apart. Because I chose to make mine with pins that go through the center of the flowers, please take care not to create something that you know for sure your child will pull apart and become a household hazard. Pins are no fun to step on.

Disclosure over.

How to Make A Fairy Flower Wand

Items needed:

  • box of lace pins
  • Styrofoam ball
  • dowel ribbons for the dowel
  • favorite flowers
  • glue/glue gun

1) Start by just taking the back off of each flower and pushing the pin through the middle and into the styrofoam. It took about 2 bundles of flowers for me to complete the entire ball. I made sure I pushed the flowers together because I liked the look of having all the flower petals mushed up, but you can choose to lay them flat.

Another thought is adding a rhinestone to the center of the flower once its pushed into place. That way the pin top is completely covered and it would add some bling to it.

2) Let your kitten help. Its more fun.

3) I then covered my dowel with my chosen ribbons, in this case it was purple and brown. I originally did it all in brown, removed it, did it in stripes and then thought I would add some leaves to the stem. Ultimately I didnt like the look so I tore it all off.

I think its ok to experiment because you can always start over!

4) Lastly I added a loop on the bottom so it was easy for my daughter to carry around with her.

I hope this inspires you to create some fun and fabulous fairy wands in your own home.

Happy Crafting!

~Trisha

Like this post? Consider tweeting or stumbling in order to help others let loose on their inner crafty mom!