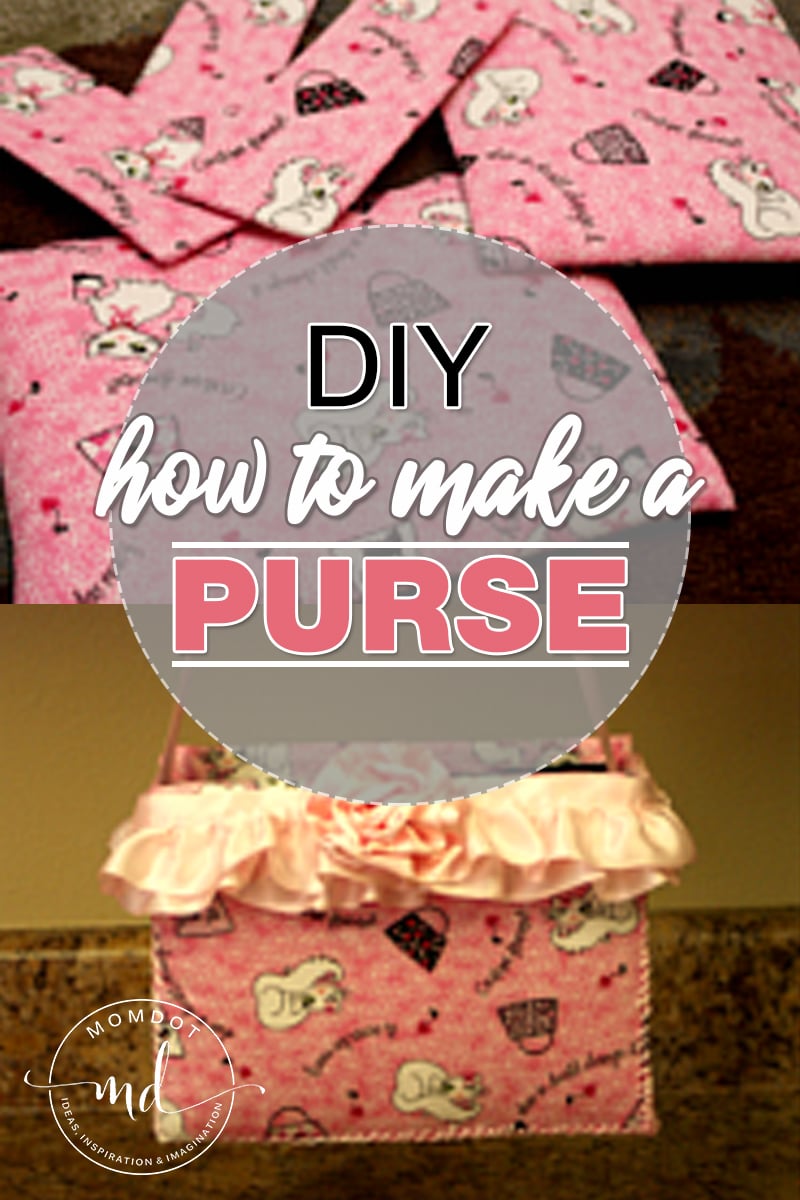
A few weeks ago I was signed up for a Christmas stocking exchange with another blogger. Part of the rules (which I made myself and started to regret) was that you needed to be creative in your stocking….you could glue it, iron it, sew it, but you had to incorporate some sort of “making” it. As I looked around, I decided that it would be totally cheesing out of me to just get some letters and iron her name on a premade red stocking.
One thing about me is I cannot sew.
I cannot sew worth crap.
So I had to come up with another way that didn’t require some Grade A Grandma Type Sewing.
However, one thing I am is crafty. Creative. A problem solver. Sorta.
What you are about to see below is what I learned doing the stocking. After I figured a few things out, I went back and used the same technique to create a purse for Charlotte. I am going to share how to make a pretty purse, but also show you the pictures of the original stocking that inspired it.
Both things were made the same way and you can create your own items this way in any shape or size.
You will need:
- Old shipping box
- glue gun
 and glue
 - quilt batting
- 1/2 yard material
- 1/8th inch ribbon to sew with
- large needle
- straight razor
- felt for the inside of the purse
- 1 1/2 inch silk ribbon for the strap
 and glue


The project cost me about $7 total, because I had batting, felt, glue, and ribbon at home.
Directions To create A Purse
(or Stocking)
1) First you need to decide the size of the purse. I measured and cut out the sides of the purse, both should be the same size (or as close as possible, I’m not an overly perfect cutter) and then used the straight razor to cut them out from the box. Be careful you dont cut up your rug, floor, or leg in this process.
(craft kitty gwennie)

2) After I had my two sides, I glue gunned the cardboard and added (double) batting to both of them so they were nice and fluffy.
3) I then laid out the material and left approx 1/2-1 inch on all sides. I put the batting part straight down (as it was the front of the purse) and glued the material to the back.
4) Cut out felt and lay in a square to “finish” the back, which in this case, is the inside of the purse.
5) I went back and measured and cut a bottom in the same length as the sides (but the width I wanted the purse to be, I just eyeballed it) and the strips that went up the side. I did not add batting, just material and felt. This should leave you with 5 pieces of covered cardboard.


6) Here is where the mock sewing comes in. Because you are sewing card board and using ribbon, your going to want to use a large thick needle. I had one the perfect size in my needle pack. I opted for a 1/8th ribbon stitching on the outside. I first took one main side (with batting) and a smaller side (without batting) and started my ribbon stitching through the material and connected to the other sides material. I followed this all the way down and around and back up to the other side. There were points I had to go through the cardboard and not just the material, but overall it was just connecting material to material.
7) Complete all sides and bottom this way. It took me about an hour and my fingers hurt by the time I was done, but the affect was cute.

8 ) Once done stitching, your purse should be pretty solid and stand up on its own!
9) Personally I wanted some more frill, so I added a ruffle around and had some extra, so I put the extra on the front and added a ribbon rosette to denote the front of the purse. I then took some 1 1/2 silk ribbon and hot glued it on the inside (side wall) and cut it at an appropriate length for Charlotte and secured int eh same fashion on the opposite side, leaving a shoulder strap.
My purse was slightly higher on the top than the sides I cut but I dont think Charlotte noticed. That’s the great thing about crafting for a 5 year old.

Finished!
This is the same exact technique I used for this stocking. Because of the batting, I did not iron on the letters or it would have defluffed it.I hot glued them on at the end. I also only used a front and a back and sewed the two sides together directly.
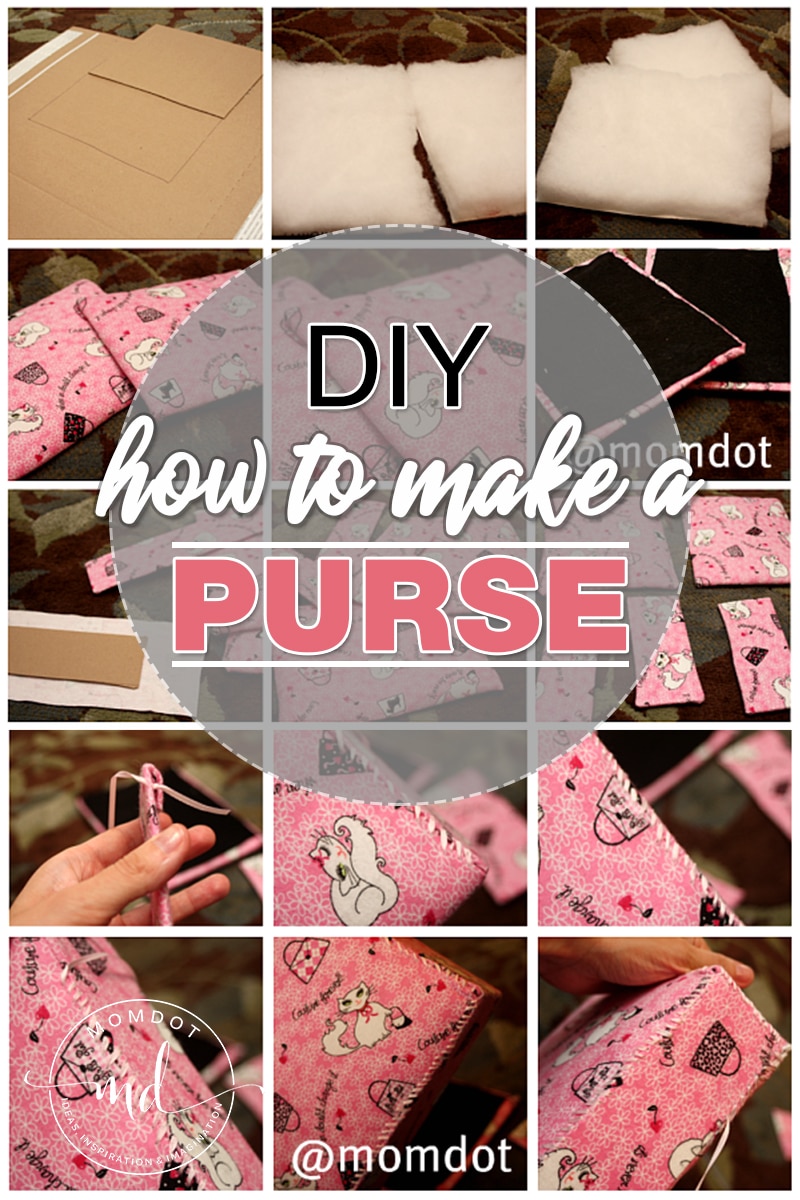
I used a flexible cardboard so I could put stuff inside when I was done.

That’s it! I hope this inspires you to create some stockings or some purses and handbags on your own! If you liked this post, please consider “stumbling”, “Digging” or sharing it with others so they can learn too.
Want more DIY? Try these before you leave

I have to say the pink fur trimming did it for me. I also cannot sew for my life so this tutorial is tailor-made (pun intended) for me.
hey,its so cute.Actually your girl is so lucky
Totally love the purse and really LOVE my stocking 😉
So cute Trisha! They turned out wonderful.
You are so creative. That purse is adorable and I LOVE the stocking! For $7, you can’t beat that price. Maybe I will have to make these for some little girls on my list!
So pretty! I love the print or design of the stocking! You are crafty indeed. The sewed ribbons on the purse is the perfect touch! I bet your thumb hurts but hey it’s worth it! Thanks for the guideline!
That is so pretty… both the purse and the stocking.
I really like the purse and I but Charlotte adores it.
I think I could even do that… HaHa!!
very nice work! 🙂
Very cute and crafty idea! You rock as a mom!
Oh gosh…I love both of them! I hate sewing too….I would never know you hate sewing!
WOW! is all I can so. You are one pretty crafty mom. How long did it take you?
How sweet! I can only imagine how much fingers must have hurt after sewing it. Bless your heart! ;D
Thanks for posting! I will definately be making the stockings for gift bags! 🙂