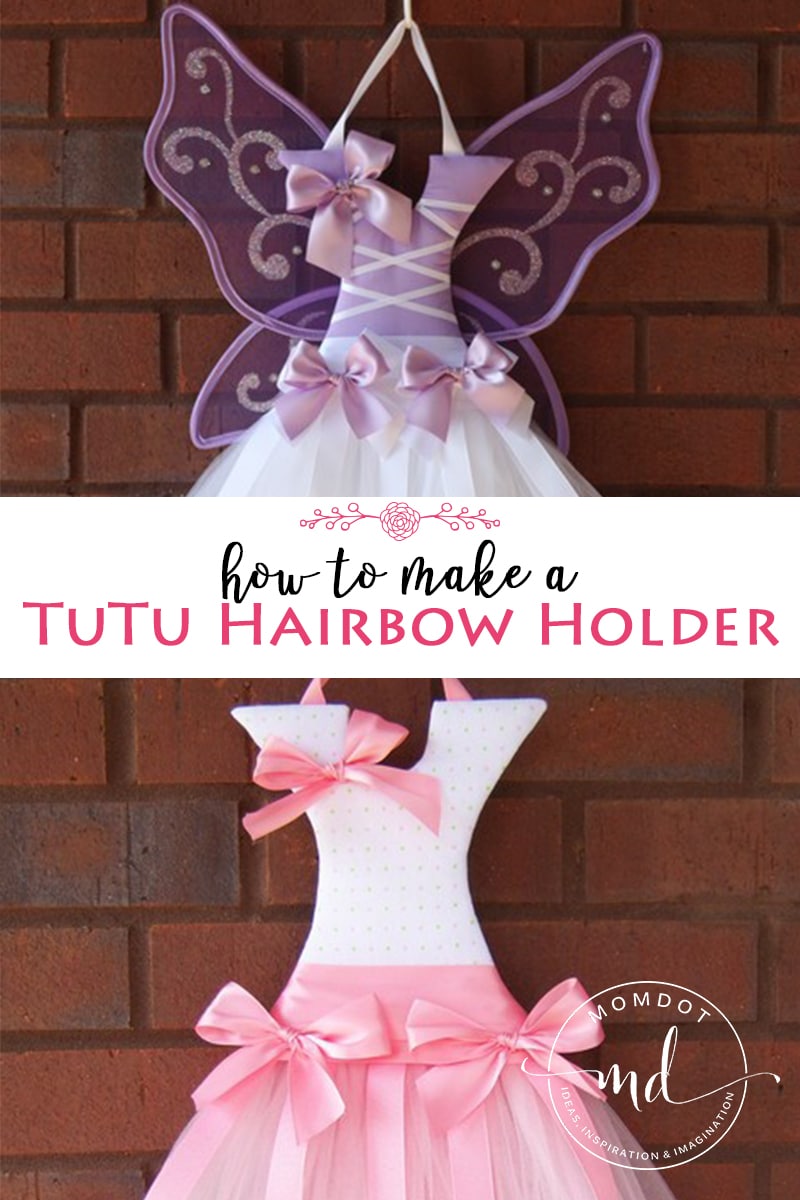
How to make a Tutu Hairbow Holder
Free Tutorial and Step by Step Instructions

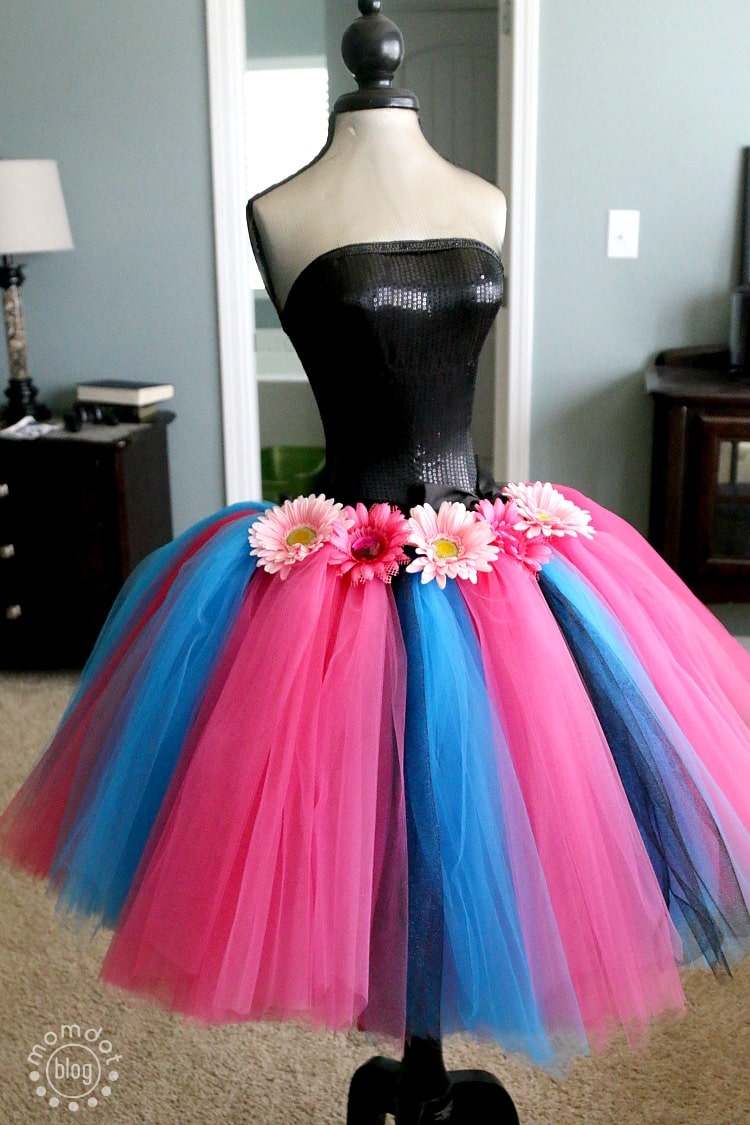
One thing you may not know about me is that I started out in the big online worked of entrepreneurship as a crafter. I know its funny considering I don’t do a ton of terribly crafty things on MomDot (and really should), but I must admit that I create sparkle, tulle, and shine on every self made project I touch. My very first tutorial here on MomDot was something simple: How to make a tutu.
I owned a little online business for a few years and sold tutu hair bow holders, handmade, to fussy and frilly mommies like me. I had a wonderful clientele, repeat customers, and still get requests (actually I got one today) to make bowholders. Because they take so long, I eventually stopped making them to focus more on family. Ironically I spend just as much time blogging, but at least my clothes do not drop glitter anymore.
For the longest time when I left crafting I didn’t want to share how to make bowholders, because I never knew if I was going to some day go back to my business. I have a really special place in my heart for them and it nearly hurts to write this post, but I am not going to start ever again and want to be able to pass on my old clients, friends, family, and others out there that either love to craft and create or are looking for an online business, a little knowledge from an old pro.
This post on bowholders is going to be so long I am going to break it up into a few different posts. Otherwise the pictures will be out of control and hard to follow. Links to the next post will be at the bottom of each post and connected together.

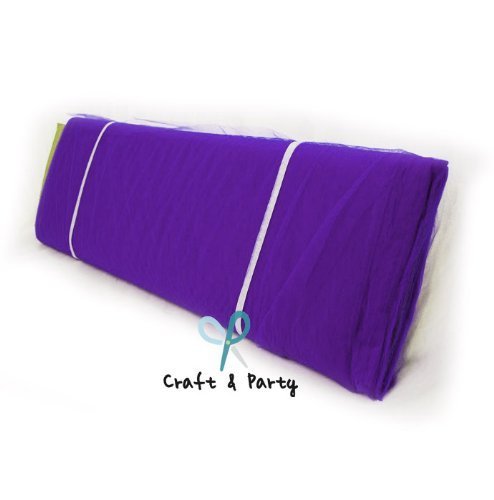
BEFORE YOU GET STARTED – BUY YOUR TULLE
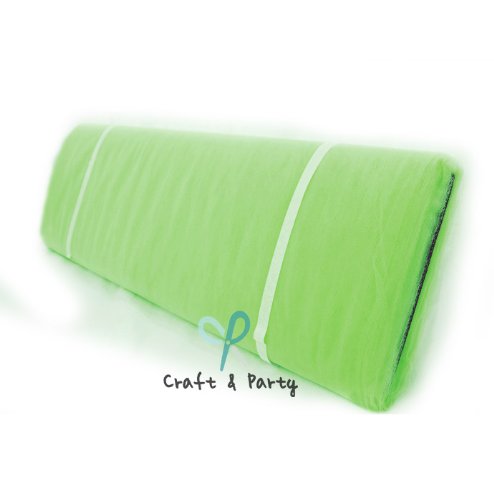
Before you get started, you will absolutely need a ton of tulle. These look best when the skirts are super full and you need to purchase tulle on a BOLT. Bolts can be expensive at the craft store, so I highly recommend you purchase a bolt (or two or three to mix colors) to make this craft.
Make sure you have your tulle ready for this craft because it takes a LOT. Buying it by the bolt is the smartest thing you can do. It’s pretty inexpensive on amazon and often with free shipping for less than half what you can get at the craft stores!
&
Ever Shine Tulle Bolt, 54 Craft and Party, 54Ever Shine Tulle Bolt, 54Tulle Bolt, Apple Green, 54


How to make a Tutu Hairbow Holder
Let’s Begin!
Now you need to make some decisions! You have to decide if you want to make a big or small holder and that will determine how much tulle, batting, ribbon, and fabric you need, but for this purpose I am going to showcase a “small” tutu bow holder so we are going to go with that. If you need larger, please double this order below and also note that I have been doing this so long I just cut on instinct.
I may have overestimated a little bit of the ribbon to give you some leg room on mistakes.
How to make a bow holder
Items:
- glue gun/hot glue

- VERY GOOD scissors
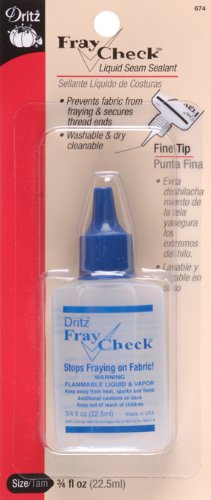
- fray check
- 3/4 yard fabric
- 1/2 yard batting
- 1/3 yard felt or 9 x 12 square piece of felt (they come precut)
- 6 yards of tulle
- 1 1/2 double faced satin ribbon, approx 1 yard
- 1/8 inch roll of ribbon (you can buy in a spool for 99 cent)
- 3/4 inch gross grain, 3 yards (do not cheap out here, get the really good stuff)
- cardboard box or foam board
- straight razor
- embellishments like flowers, spray glitter, rhinestones, etc.


 , 3 yards (do not cheap out here, get the really good stuff)
NOW AVAILABLE: Go here get your FREE DOWNLOAD for the Tutu Bodice Pattern
- Deciding on a design: Sometimes wandering up and down the fabric aisle will help you on the right direction. Be careful not to get too enamored with stiff fabrics. Cotton or flannel works best. Note that flannel is more pliable but can fray quickly, so heed the warning on fray check!

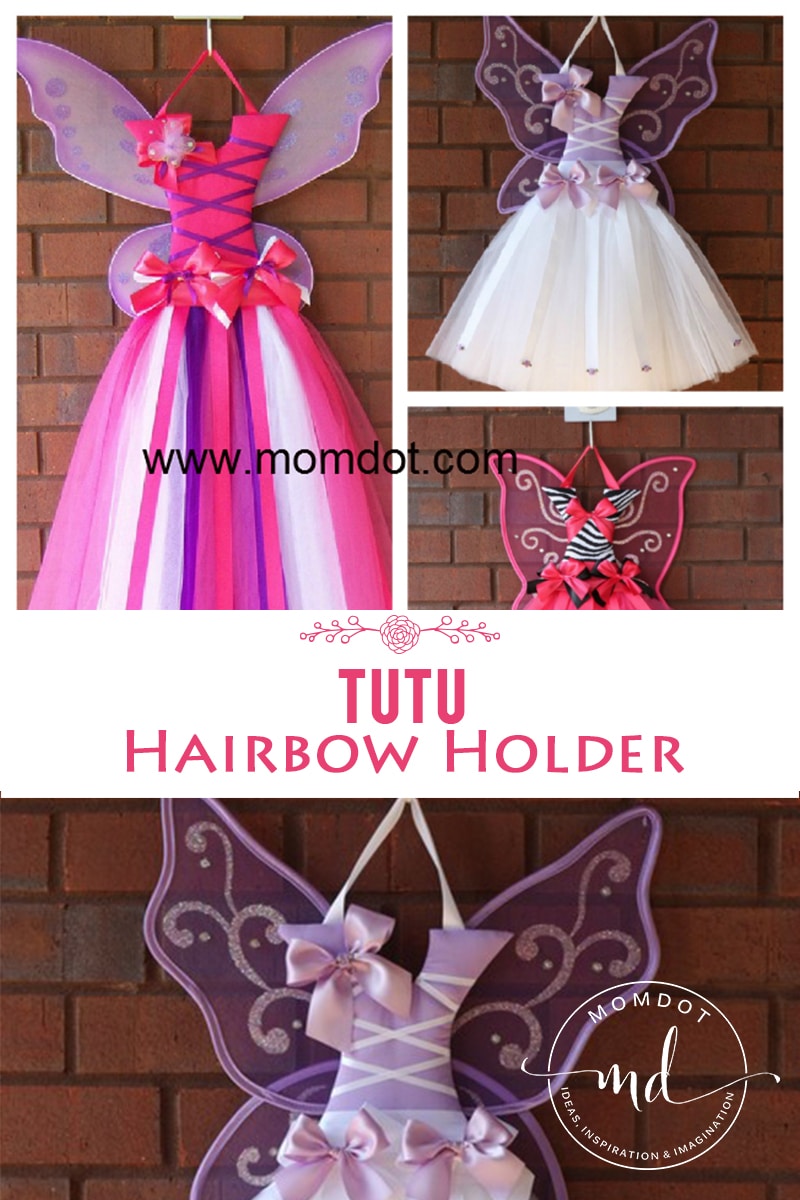
Here are a few of my past designs to get your juices flowing:


Inspired?
Great!
For this tutorial, I am not adding wings. I just didn’t have any matching ones laying around. If you want to do wings, you can get them from Hobby Lobby in the birthday party section or order from Dress up Wholesale. Those are the two places I purchased my wings.
2) Creating a Bodice: First you will need to cut yourself a pattern for the bodice. The easiest way to do this is to take a sheet of paper, fold in half, and draw out the arms and dress. Then cut and unfold. I have experimented over time on different body types and this is my favorite. Doing it on the paper will ensure that your bodice is symmetrical. You can decide on a size this way OR I have now provided a template to guide you. See yellow box below to print.
NOW AVAILABLE: Go here get your FREE DOWNLOAD for the Tutu Bodice Pattern
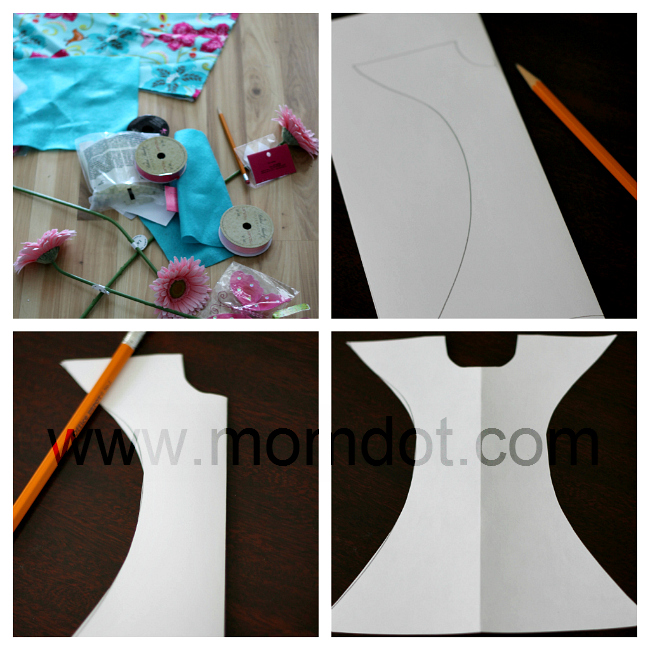
3) Take your pattern and lay on either your foam board or your piece of cardboard. Trace out TWO pieces. Then use a straight edged razor to cut out. Be very careful!
Hot glue both pieces together so they are very strong. I personally have always used cardboard (thin tough kinds), because it’s soft if the piece ever falls off the wall but is VERY strong and durable. If you only use one piece your bodice is more likely to bed over time, so make sure you do two. If you use a piece of scrap cardboard, make sure that any picture/words face INSIDE. The brown of the cardboard should always be your “top”.
4) Once your pattern is cut and two pieces glued together, lay on your batting. I always use THIN batting. If you are making more than one, you can buy a piece of batting for quilting for about $12 at Walmart. It’s enough batting to make about 25 bow holders or more. Otherwise, you can buy the 1/2 yard at places like Hobby Lobby.
Hot glue the FRONT of your bowholder to the batting.
Then cut out the excess and do it again so it’s doubled.
 (Pic shows pattern in two sizes, a large and a small. For this demo we are making the small)

5) The next thing we are going to do is place the fabric . When you are picking out a fabric, its important to look at the pattern. Some fabrics look weird if pieces of it are missing when you cut, so make sure you find the part of the fabric that you want showing and cut a large enough piece that you can center your bodice. I wanted the little pink bird on mine, so I am cutting my fabric around that.
Place your bodice over the part of fabric you want and cut into a square around, leaving a few inches around the entire piece. Then, once centered, cut the pattern of the fabric to the bodice, leaving about 1 inch on all sides. If you are in doubt, leave extra material.
You can always cut some off, but you cannot add it back in if it’s too short!

6) This is one of the tricky parts. To get the fabric to lay flat and be easily bendable, you are going to need to cut little slits up and down. If you do it too close to the bodice, your seam will split to the front. If you do it too far, it will crease the fabric. Your best bet is to start in the middle and cut and do little cuts up and down, stopping just short of your shoulders and the bottom of the bodice. Before doing the other side, go ahead and place your hot glue on the cardboard and then start IN THE MIDDLE and pull and stick, pull and stick. All the way up and then down. Then reverse and do the other side. Make sure you pull taut enough to keep creases from the front.
Dritz 674 Fray Check Liquid Seam Sealant, 0.75-Ounce
*Note: You can pull most fabric creases out from the bottom, so don’t stress if you have some at this point.
FRAY CHECK! FRAY CHECK! FRAY CHECK!
Fray check your slits on the backside to prevent them from ever ripping to the front.
7) Now cut the slits for the neckline. These are probably the most difficult thing to do in the entire craft. If you cut these too long, it WILL bleed to the front. But at the same time, its a really close call. If you leave too much fabric it gets all bunchy, so it’s something that will come with time and practice. Also, because you are working quickly here, you have more of a chance to hot glue your fingers at this point. HA!
FRAY CHECK FRAY CHECK FRAY CHECK

8) Fold the inside of the shoulder in, and then the outside. I generally fold in, but if you have too much excess fabric you can cut and then fold. Glue down.
Note: I always use the fold to go along the seam of the cut to clean them up and help with nice finishing work. You can see on the picture below on the “inside” that I have folded it along the edge of the neckline cuts. The more care you take during the craft, the nicer it will be in the end.

9) The last part of the bodice is to pull the bottom. By now all your sides, top and shoulder should be done. Flip to the front and then pull your fabric tight. If you have any creases in the front, this is where you can pull them out. Then glue down in the back.

10) I will be the first to admit that I didn’t take ultra care on my creases….I knew I was putting embellishments on that would cover any additional ones, but I still highly recommend taking care during the process, SPECIFICALLY if you are selling an item.

To continue your bowholder making, there are other links! The post got too long so I had to break it up.
You get to add your skirt next!
- How to make a tutu hairbow holder (step #1, this post/bodice)
- Free Tutu Hairbow holder Tutorial (step #2, skirt)
- Tutu Hairbow Holder Instructions (step #3, back and detailed work)
- How to make a tutu (completely different tutorial so when you are done with this one!)

Also please follow my tutorials on pinterest here
Follow MomDot’s board MomDot Blog on Pinterest.
Love this post? Try how to make a how to make a no sew tutu by clicking below!
or check out a ton of Crafting Tutorials here!
Additional resources: 30+ Sewing Machine Options
i would do a thinner one
How do you attach the tutu?
I can’t find how.
Its in the following posts, just go to the next post (there are 3)
O! I see it!
Thanks! I got almost everything I need for it.
I finished! and it looks very cute. How do I send you the picture?
does the grosgrain ribbon HAVE to be 3/4 or am i able to use 7/8 inch?
You can use any type of ribbon you want honestly. It will just change your placement. 🙂
Is there a pattern to the bodice or measurement sizes? Love this Tutu bow holder!!
Thank You
Susan
No, i sorta just wing it according to the size of the printer paper. 🙂
I came across your blog and I think it’s god sent! I am starting my business and even have my own website. I would REALLY APPRECIATE YOUR AVISE, thought, comments and even clients! Please let me know if you are willing to help a stay at home mom who is trying to keep busy AND make a career out of a craft I absolutely LOVE! I put my heart and sould into every item I sell and business is going ok for being a beginner, but I learn something new everyday and I encourage my clients and future clients to send me requests (most of my requests have become my best sellers) so please send me any input that a small business owner can benefit from I would appreciate it!
Thank you,
Ana
This looks adorable!
Thanks for sharing,
Kelly
This is so cute I may go into sugar shock! I love it!
wow totally in love with this 🙂
This is adorable! My oldest tells me she’s a super hero ballerina. I may be able to make that! 😀
I was just wondering if you could give me the overall measurements of the TUTU from the top of the shoulder to the bottom of the tulle. Also since I’m using rolls of Tulle can you tell me the lenght of the tulle I should cut if possible. Also how many bunches of tulle did you use on the skirt. Thanks so much.
I am going to have to make this for some adorable girls for Christmas. Thanks for the wonderful tutorial! I am a step by step learner, and this makes it so easy for me!
WOW what a beautiful holder. With great instructions and plenty of pictures to keep me on track I was able to make one for my niece. Thank you for sharing your talent with us.
OMG…I came across your blog this morning as I was looking for barrette hanger ideas for my new niece. Well, this was it…I LOVED IT!! Needless to say…8 hours later a Tiffany blue one has been made. Thank you so much. Your directions and pictures were perfect and easy to follow. Now my other sister wants one for each of her girls.
Thank you bunches for sharing!!!
Yay!! So happy to help 🙂
Been reading the comments. What is the width of the bottom of the bodice and the length of the bodice for a large bow holder? I’m fixing to start making one for my daughter. Thanks!
Hi, I was wondering if you posted the template . Or if you could let me know how big of a piece of paper to use. Or is it just an ordinary 8×10 piece of paper
Thank you. I would like to know because my four year old daughter just seen theses bow holders and loved it
Its an ordiary piece of printer paper
I was wondering if there is a place to print this.
Did u ever upload the template of the large and small bodice? Or does anyone who has made these sent u their patterns, I too can not draw for anything. Please help this really in need grandma of 7 grand-daughters to make this beautiful hair bow holder. I would greatly appreciate it ASAP!! Thanks!!
I am starting this project this weekend! I can’t wait to make it as I think my daughter will love it 🙂
I just have one question: What size is the bodice for your large and small?
Thanks!
Fantastic tutorial and brilliant finished project!! Can’t wait to get one made!
I followed your easy to follow instructions and made my first mid size bow holder. It turned out beautifully. I have a customer who wants me to make her newborn one in a different color. The back of the top is a tell tale sign of how good the piece is. I can’t get over how good mine turned out the first time. It was no easy task. I had to take my time and burn my fingers a few times but it was all worth it in the end. Thank you for sharing your knowledge and talent. It is much appreciated and will be used with less anxiety!!
thank you so much for shareing your imformation with us. I was wondering how do you make the ribbon that holds the head bands. I see loops. how is that done.
All you do is measure out double the length of the final length you want it to be…so if you its 6 inches, measure 12, etc.
Then lay flat and put a dab of glue every 2 inches. Then fold in half…it will leave “loops’ Between the glue daps for you to put a headband in.
How much did you sell these for? Just curious because I am not good at not basically giving things away. Haha.
when i first started in 2005, i sold for way under my time. By the time i retired my business i sold between $69-$120 a piece and had a good amount of business. Keep in mind i was REALLY good at these.
Wow, I really enjoyed your post, not just the really well done tutorial, but the post itself. It takes a real special kind of person to share this craft, and wow you made some beautiful holders! With all the disclaimers online lately (even crafters claiming they came up with the idea of a project that has beenn around since before many of us were out of diapers). I think its very admirable and by the feedback on this post I would say lots of props come from all over! Enjoy your family, and the things you make do have a sparkle!!
aww, thankyou! I am so glad you enjoyed it! I love crafting…even though I dont have a crafting blog really, when I do something fun, its great to share. I am glad it has been able to help so many people make this craft in their own home.
I made my first one last month to display my bows at craft fairs and I got so many compliments and 2 orders. Thank you thank you thank you. Lydia
Trisha, just made one of these for my niece and starting one for my grand daughter, great tutorial. I saw that your bodice is about 12 inches and you said the skirt is also about 12 inches in length, is that for a large one or small one? I made mine a 12 inch top and 2 foot bottom, needless to say I used 12 yds of tulle for the skirt but it looks great. Any other pointers you can give is always a plus.
thank you so much for the step by step. its was so easy to follow and made great results. I do have one question.. we have been searching for wings… they are very hard to find in small enough sizes. do you have any suggestions as to where is a good place to buy wings???
Hobby lobby carries them in the birthday section
Our dollar store carries some nice Smaller sized Wings
Im am so grateful to you for posting this. I recently started making bows at the end of last year and Im now confident enough in my work to begin selling them. Its ladies like you, and your willingness to share with others, that have allowed stay at home moms like me a way to contribute to the home financially!!!! I cant wait to make my first one and to sell my first one….thank you sooo much!!!!!
thank you very vey much for posting this i wish that i knew how to post an attachment so that i could show you pictures of the beautiful tutu hair bow holder that i made for my granddaughter. i have never been one to do crafts, i do know how to sew, but that has been the extent of my crafts. after posting this to show to my daughter, i was told that i should make them to sell, don’t know if my fingers could take it though.. lol.
Yeah I did it for a few years…its hard on your back too!
TRISHA, I love your Hair bow holders . I would like to know how or where can I get the wings. Do you make them your self or do you buy them at Hobby lobby.
I bought them from HaloHeaven.com and Hobby Lobby
So the small is a 12 inch bodice? what size would the large be?
Thanks
Thank you, Trisha… that was so sweet of you to share with us! I am going to make one for my 7 yr old Grandaughter, Lily. I made her a dozen hairbows for Christmas and this will just complete her gift.
God bless you…Kate~
Have fun Kate! Send me a picture when you are done, love to see it!
I made one last night for my step daughter and would love to send you a picture but I don’t know how.
you can email me if you like! [email protected]
Could you please share the length of the bottom of the bodice of both the small and large, as well as the height of the bodice of the small and large? Thank you! Super cute idea!
I was just wondering would you be able to upload a template of the bodice for those of us who are not so handy at drawing them
Do you have a template for the tutu bodice
no i just draw one
How long should the tulle be?
Thank you, thank you, thank you! I pinned this months ago because I thought it was adorable, but never really had the courage to try it. A sweet friend of my daughter had a birthday and I thought this was the perfect gift for her. I was a little terrified, but WOW, you really make it easy! Step by step by step and it turned out amazing and the birthday girl loved it! Thank you for giving this precious gift of your time and talent away to us! It took about 4 hours to do the first one, but I’m hooked now! I’ve bought the supplies to make four more for upcoming baby showers and birthdays…and one for my daughter, she thinks it’s the coolest thing ever!
were can i get all the materials i need do u have a tutorial on how to make the bows?
I haven’t done any tutorials on bows yet. You can get tutu materials at Hobby Lobby
These are adorable! Thank you so much for sharing. I was looking for a way to organize all our bows to make morning hair time easier–and this is such a cute idea for them! I look forward to creating my own for my girly girl!
Soooo cute!!! I’m not a very crafty person at all. I was woundering do you sell them and if so
where could i get one. I would love to have one for my Mayliah! Thanks
i used to sell at bambinaballerina.com but i no longer sell bc its too time consuming for my family….but i put up the instructions for others. Its not as hard as it looks w/ some practice and it is fun!
hi i luv these they are amazing .can you tell me the sizes of bodice and what lenght is the tutu.cant wait to start.would really appreciate your help.fiona
Was wondering exactly how to cut and put the tulle on. I have made the bodice and it really looks good. Thank you for all your info.
There are two more posts that explain it all…just go to the next one.
🙂
Wish I was this creative!
Hi, I don’t have one creative bone in my body. LOL I am in love with your designs. Do you sell your bow holders, and if so, where do I go?
What size do you use for tulle?? I looked at hobby lobby and the workers advised the 6″ (INCH) rolls but that did not seem right to me. Any advice would be appreciated.
Thank you, Jessica
you can use that if you want but you will have tons more pieces. I prefer tulle on the bolt. It comes folded…leave it folded. I think in my 2nd post on the hairbow holder i have a youtube video that shows my tulle.
Thank you, just saw the video. I will definitely try it that way.
Thanks:)
you are welcome!
Could you please share the length of the bottom of the bodice of both the small and large, as well as the height of the bodice of the small and large? Thank you! Super cute idea!
I featured this tutorial on my blog today, sending blog love your way. Thank you so much for writing this tutorial!
thankyou so much for the feature! that was really nice.
This is wonderful. I just saw something similar to this at Hobby Lobby (but not as a bow holder), and I thought to myself, “I need to figure out how to make this and turn it into a bow holder. It was made of plywood, so I hadn’t even thought of using something much lighter and easier to cut like cardboard and batting. I can’t wait to make one for my princess!
I just love your tutorial! I have read and re-read it many times. I am planning on making 3 different ones for 3 very special little girls. Can you tell me the approximate measurements for the long bodice? That way I can mark the top bottom and sides before I draw it out? Thanks!
I do mine about about a foot long
Awesome. Thanks. What I love about yours in particular is that it is long and narrow. A lot of the other ones out there don’t look as elegant because they are wider. And I also love the ing skirts. They are very appealing to the eye plus they have more room for more bows. How wide is your bodice?
If you use foam core do you need to double the bodice of is it thick enough for for 1 body?
I have never used foam, so I am not sure. I like the strength of doubling.
Thank you for sharing! I am crafty myself and I loved learning from you!
My daughter sent me this site so I can make them foe her twins. Anytime I get these I know she is thinking, ok Mom here you go. Thanks for sharing. Janet
Just sent you a pic of the one I made today! THANKS!!!
oh yeah! i cant wait to see it! Check out the new craft i was blogging too https://www.momdot.com/how-to-make-a-tutu-chandelier
Okay… I have finally gathered all my supplies, and am sitting down to start. I’m going into the hospital to be induced at 2 am Monday… so I should probably finish this project VERY soon!!!
Thanks for posting this! I’ve looked at them on your website many times and have always thought you did a beautiful job!
I was just wondering would you be able to upload a template of the bodice for those of us who are not so handy at drawing them 😉
i suppose i could do that! i wonder if i could just scan it in
that would be amazing trisha 😀
That would be great because I cannot draw straight for the life of me. I am just not talented in that way. 🙂
Scan your pattern and then you can upload it to Google documents. There you can get an embedded link to add to your blog.
Is there a link to the drawing of the tutu that people asked for yet?
thanks soo much for sharing! I know it must have been hard 😉
I have been looking for a good tutorial to make some of these and glad i stumbled across yours!
going to make some this weekend!
These are just beautiful. I was wondering what the measurements are for the small and large?
Thank you so much for sharing.
Off to read all the steps but this is absolutely adorable!
Absolutely love this!
So adorable!!
These are so cute! Thanks for sharing!
I love your hairbow holders, so adorable. I need to try making one for my daughter, thanks for sharing 🙂
Perfect timing! We have a birthday coming up and I know my daughter would adore this.
Thanks for sharing!